

Three tools, three completely different finishes — and a lot of confused shopping. Crimpers, wavers, and curling irons all use heat and all promise "texture," but the texture each one makes is different enough that buying the wrong one means never getting the look in the photo you saved.
This comparison covers what each tool actually does to the hair, what the finished look is, which hair types each suits, and how much effort each takes — so you can match the tool to the look instead of guessing.
At a glance
- Crimper: presses a repeating pattern into the hair with textured plates. Result: defined zigzag or grid texture and lots of visible volume.
- Waver: clamps hair between barrels or a deep-wave plate to form loose S-shaped waves. Result: soft, beachy, undone waves.
- Curling iron: wraps hair around a heated barrel. Result: round curls or spirals — the most polished, "done" finish of the three.
The crimper: pattern and volume
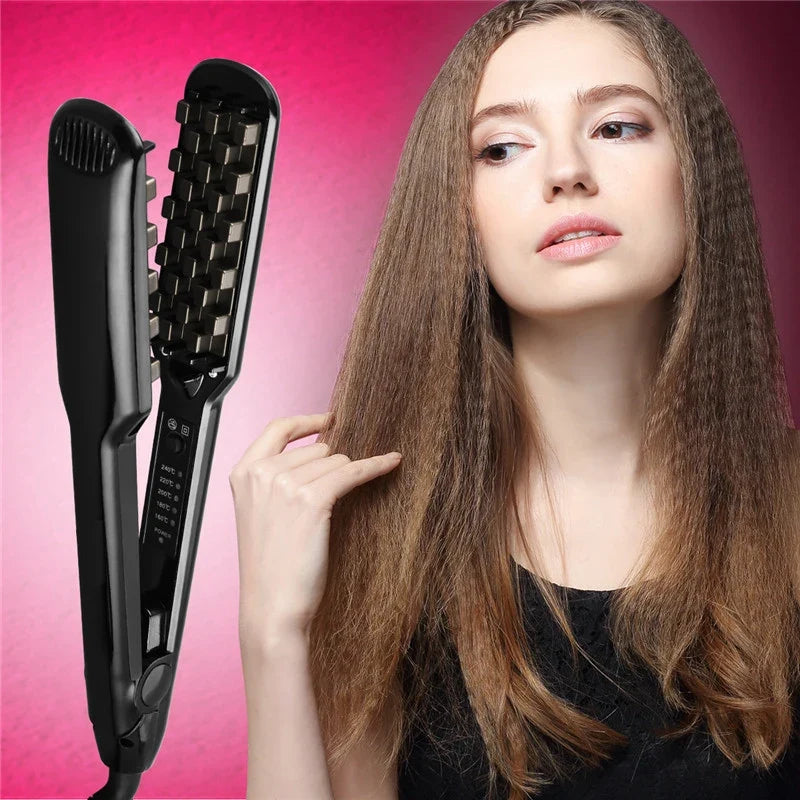
A crimper works like a press, not a brush or a barrel. Two textured plates close over a section of hair and imprint their pattern into it. Our Ceramic 3D Grid Hair Crimper uses a grid pattern, which presses a crimped, textured wave into each section — a look closer to a braid-out or a vintage crimp than to a curl.
The look: defined, repeating texture with serious volume. Crimped hair looks thicker because the pattern lifts strands away from each other. It's a statement texture — great for ponytails, half-up styles, and adding grip and body to fine hair before an updo.
Effort: moderate. You work in sections, clamping and moving down each one, lining up with the last impression. It rewards patience but not precision — the pattern is the same every time, so results are consistent once you find your rhythm.
Best for: fine or flat hair that needs visible volume and texture; anyone who likes a bold, patterned finish; prepping hair with grip before braiding or styling up.
Not ideal for: someone who wants soft, touchable, barely-there styling — crimp texture is deliberately visible.
The waver: soft S-waves
A waver (sometimes called a deep waver or triple-barrel iron) forms hair into continuous S shapes. Instead of wrapping, you clamp down the length of the section, and the barrel geometry does the shaping.
The look: loose, relaxed waves — the "beach hair" finish. Less defined than a crimp, less round than a curl. It reads casual and modern, and because the waves are uniform, it looks intentional even though it's forgiving to create.
Effort: low to moderate. Clamping down a section is faster than wrapping a curling iron strand by strand, and the S-shape hides minor inconsistencies well. Thick or long hair still takes time simply because there's more of it.
Best for: medium to long hair; anyone after an undone, everyday wave; people who find curling irons fiddly.
Not ideal for: very short hair (there isn't enough length for the S to form) or anyone wanting tight, defined pattern or curl.
The curling iron: round curls
The classic. Hair is wrapped around a heated barrel, held, and released as a curl. Barrel size decides the result: smaller barrels make tighter spirals, larger barrels make loose, bouncy curls.
The look: the most versatile and the most polished. Curls can be brushed out into soft waves, left defined for a formal finish, or mixed in size for a natural effect. It's also the easiest look to get wrong in small ways — uneven wrap direction and inconsistent section sizes show.
Effort: the highest of the three for beginners. Wrapping technique takes practice, and results vary more with skill than with a press-style tool. The payoff is range: no other tool here covers as many different looks.
Best for: anyone wanting classic curls or a formal finish; medium to long hair; people willing to practice a little technique.
Not ideal for: someone who wants a fast, repeatable result with minimal skill curve, or fine hair that needs texture more than shape.
Matching the tool to your hair
A few patterns hold across all three tools:
Fine or flat hair benefits most from tools that build texture into the strand rather than shape around it. That's crimper territory: the pressed pattern creates the impression of thickness even before any styling product. Fine hair also tends to drop curls quickly, which makes the curling iron the most frustrating of the three for this hair type unless the curls are fully cooled and pinned.
Thick or coarse hair can handle any of the three, but section size decides the result. Large sections in a crimper or waver heat unevenly and lose their shape; smaller sections take longer and hold far better. Thick hair also suits the waver particularly well, because the S-shape reads clearly through density instead of getting lost in it.
Short hair rules out the waver in most cases and makes the curling iron a precision exercise with a small barrel. A crimper can still work on shorter lengths — the pattern needs only enough hair to clamp — and a crimped fringe or crimped top section is a legitimate short-hair style.
Damaged or fragile hair calls for honesty rather than a tool recommendation: any heat tool adds stress, so whichever you choose, use the lowest effective approach, work on dry hair only, and give heat styling rest days. Texture created by braiding damp hair overnight is the zero-heat fallback that imitates a waver's finish.
So which one should you buy?
Match the tool to the photo, not the name:
- Want visible pattern, texture, and volume — especially on fine or flat hair? Crimper.
- Want relaxed, beachy waves with the least technique? Waver.
- Want classic curls and the widest range of finished looks? Curling iron.
One more consideration: these tools are not mutually exclusive in a routine. Crimping just the underlayers is a stylist's trick for volume that stays hidden under smooth top layers, and a curling iron can soften the ends of waved hair. But if you're buying your first texture tool, buy for the look you wear most often.
Whichever direction you go, you can browse the full range in our Professional Styling Tools collection — and remember the rule that applies to every heat tool: use it on dry hair, work in sections, and let each section cool before you brush or style it, so the shape sets instead of falling out.


